Tuesday, June 7, 2016

Interactive Notebooking With Barton Reading and Spelling

So I haven't been able to write any new posts for the past few months because we've been busy moving to our new house! Exciting stuff, but it has definitely kept me busy. 

One big change with the move has been that I had to leave my tutoring students. That was incredibly difficult for me, but fortunately most of them were able to find alternative arrangements. BUT, one of my students is a teen and they really could not find another Orton-Gillingham tutor in the area (trust me, I even called for them and NOBODY was accepting new clients!) So, I get to continue tutoring her.....remotely via FaceTime :) 

With the new format I really needed to rethink my organization strategies and how I would structure our lessons. We would also be taking a one month break for tutoring, which definitely made me nervous because I would need to build in some review time when we started up again. 

Fortunately I've been eyeing all these neat Interactive Notebooks on Pinterest and TeachersPayTeachers and realized that this was exactly the format I needed to organize our stuff and keep a record for my student to review at home. This has the added benefit of allowing her grandma, who is her primary teacher, to see exactly what we've covered and refer her to the spelling rules vs relying on her granddaughter's memory. 


One of the key features of an Interactive Notebook, much like the adult-version....Bullet Journaling....is the table of contents in the front. This makes it easy to find whatever you are looking for. On the inside of the front cover I used Avery Full-Page Labels (basically huge stickers) and printed out resources on one. The top sticker lists the materials my student should have with her for each tutoring session. I have an ADHD and Dyslexic teen myself.....so I know how remembering materials can cause all sorts of problems and angst no matter how hard they try :)

Each page of the notebook is also numbered at the top. This helps with referencing the notes later and it allows me to tell her to turn to a particular page if we're reviewing a previously-learned concept.


After the Table of Contents (which spans 6 pages), the notes begin. I have roughly one page for each lesson. Some lessons include more than one separate teachings with very different rules and so I separated out those as necessary. A few lessons have the notes taking up an entire page if it's simply review, but most have a smaller box of notes that fits at the top of the page. I print each one and send them to my student to cut and paste as we learn each concept. The notes list the spelling/reading rule, a keyword picture, and a definition and examples. 

Below the notes the student can write out her "Spelling on Paper" words, phrases, and sentences during the lesson. This works into the lesson really smoothly and it provides further examples later if she needs to refer to it. 

I'm so enjoying this addition to our tutoring sessions that I've started implementing it with my daughter's Barton lessons too! She seems to like it so far and I like that now the onus is on her if she forgets a rule and wants to be reminded of it. I can easily refer her to the notebook where she can find the rule, see the definition and examples, and explain the rule back to me. 

It's also been a sneaky way to review the concepts we covered before my student and I took a break :) 

Sunday, February 28, 2016

Reading Comprehension With Visualizing and Verbalizing

I have spent a lot of time working on teaching kids how to decode words and parse out how to say a word. But sometimes just being able to decode a word isn't enough. Some children need to be taught explicitly how to understand what they read, not just how to read it.

My Ana is one of those, mostly I think just because of her hearing disability and lack of language exposure early on. Many kids on the autism spectrum also require this sort of specific instruction in comprehension.

Anyone who does much research into the world of dyslexia and educational remediation of all sorts probably has come across the Lindamood Bell Centers. They are wonderful, effective, intense...

and extraordinarily expensive!

I called once before getting trained in Orton-Gillingham to see if they could help us with Ana. They quoted something like $20,000 for their 12-ish weeks (240 hours) of intensive tutoring over the summer. I think I about died when I heard that. Needless to say that was not an option for us, nor is it for most anyone else I know honestly!

Fortunately I was able to be trained in OG myself and that, plus Susan Barton's system has more than helped us to tackle the decoding aspect of reading. But I was still left with a child who struggled to comprehend things she read or heard. In fact, even describing a picture or a past event is difficult enough to induce tears!

Luckily, Lindamood Bell also has a system for comprehension called Visualizing and Verbalizing, and Gander Publishing sells a reasonably priced manual for it. Really all you need is the manual and some pictures to go with it, plus a few index cards and cardboard or felt colored squares.

I've been slowly reading through the Visualizing and Verbalizing manual these past few months and have begun the picture-to-picture stage with Ana. In this stage she describes a simple, colored picture to me and we work on going through each of 12 structure words to guide her description. Then I repeat her description back to her in my own words, describing the picture she made in my head through her description of the real picture that I cannot see.

The structure words are a fairly simple concept but I did find it useful to make up some extra notes on them. Especially because Ana not only needs to learn comprehension, she really needs to be taught enough vocabulary words to adequately describe an image.

I turned those notes into a printable for her benefit and I'm planning to laminate these and pin them around the schoolroom as study guides for her as she describes pictures or words. My notes go beyond what the manual describes, drawing connections to the part-of-speech each structure word points to, having a question for the student to ask themselves as they look at a picture or read, and listing whether it is a gross (large/main) or fine (small/less necessary) structure word. At the bottom are graphs or graphic organizers listing out many examples of words the student might use in describing a picture/word/sentence with that particular structure word.

This is an example of my basic notes for the first structure word:


You can find the entire printable in my store on Teachers Pay Teachers

Has anyone else used V/V at home? Did you find it fairly easy to DIY? Have you found any other great reading comprehension resources?

Thursday, February 25, 2016

Another Review Game and Joining Teachers Pay Teachers

Hi! I've been so thankful lately to have several students starting new levels in Barton Reading and Spelling. It's so rewarding to see the hard work of hours of tutoring one-on-one and troubleshooting for each student's particular struggles pay off.


(sometimes I have to bribe Ana through her reading lessons with baby time with her baby sister!)


My daughter, Ana, is now in Level 5 and doing great. It's a big relief after how intense Level 4 was to have an entire lesson on something as simple as suffix "s" and "es"!

With her on Level 5 and another student about to begin the same level a few lessons behind, I wanted to add some extra practice games for the girls. Ana has profound hearing loss and so she has significant language delays. So while the spelling/reading aspects of suffixes haven't been nearly as difficult as tackling multi-syllable words and schwas and vowel teams, I'm using this as an opportunity to advance her vocabulary and language skills too! This is one of the things I love about Orton-Gillingham instruction, it's so multi-faceted that it doesn't just get dyslexic children reading....it teaches them how the English language works.

I've decided the easiest way to upload and share some resources I've made is through Teachers Pay Teachers. It's an established site, lots of people already frequent it, and it's easy to use. I've found several fantastic resources there and I highly recommend that more homeschoolers or independent tutors make use of it. There are some really talented professionals on there sharing inexpensive resources for others.

To start off my account I went ahead and uploaded the newest game I made for my older students. This one is created for students at or above Barton Level 5: Lesson 2 OR any Orton-Gillingham students who have learned the suffixes LY, LESS, FUL, NESS, and MENT.


Thursday, February 18, 2016

Barton Level 3 Game: Drop It!


A few weeks ago I arrived at my tutoring student's after school program and realized I had forgotten to bring a game with me! I ALWAYS end tutoring sessions with a little game because it helps motivate the kids and it's my sneaky way of practicing concepts. 

I had five minutes to brainstorm and just my usual tutoring supplies at hand so I came up with this:


Drop It!

Materials: a whiteboard (or a large poster board), a marker, letter tiles

Prep:

1. Make a 5 x 6 grid 

2. Write words without the first letter in each box. For example: for "bent" you would write "ent".

3. Gather a handful of letter tiles that would make a real word out of some of the words on the board. The ones I used include: B, D, F, G, H, J, L, M, N, P, QU, R, S, T, V, W, Y, SH, TH

Play: 

Each player chooses a color marker to be theirs. We did blue and red. 

Taking turns, each player selects one letter tile and attempts to drop it (from a standing position, no bending knees allowed) onto the board. 

When the player successfully drops a letter tile onto a word they read the word with that letter as the first letter. For example, if player 1 chooses T and it lands on UNT they would say "TUNT". If they read it correctly they get one point, signified by a slash / . If they make a real word they get two points, signified by two slashes, making an X over the square. 


There are a couple options for how to end the game. You can time it to the end of the game period or the end of the lesson. OR you can go until all the squares have been hit. 

The player with the most points at the end wins!


Monday, February 1, 2016

Marking Syllables Trick

This week has been extremely busy but I wanted to share this quick idea that has been working for me. Since I put all our student pages in protective sheets we use dry erase markers to mark syllables, but sometimes it wasn't as easy because the markers are slightly bigger and one of my students has Irlen's syndrome so it is hard for her to make her eyes focus on the separate syllables. I had seen syllable sliders recommended by Susan Barton but just didn't have it in the budget to get something like that for such a minor purpose. 

So, we started "highlighting" syllables with the dry erase markers instead. This way we can mark as many syllables as we like without any trouble and because it erases if my student realizes they divided it incorrectly the first time they can easily fix it. 

Plus, pretty colors!


Monday, January 25, 2016

Setting Up Barton Materials for each Level


I'm just now setting up our Barton Level 5 stuff and watching the tutor DVD's so I thought I'd show you how I set up all that Barton stuff! I'm a visual person and need everything very organized or I lose track of where we are so when I saw a discussion on a yahoo group about how to set up a binder for each level I immediately jumped on that idea!


I hope that is helpful to see it! It's a pretty simple setup, nothing complicated, but I know I had not thought to put the student pages in plastic sleeves like that until I saw it mentioned on a tutoring group! 

Soon I'll hopefully do another video or series of pictures showing the student binders I set up with the more consumable papers. 


Saturday, January 23, 2016

DIY Board Game


As we were chatting about in the comments of my last post about Barton 4, it's crucial to take time to review and practice skills as you go through Barton Reading and Spelling. 

When I first started my daughter in the program I didn't know about the fantastic Spelling Success games so I DIYed some basic games to help her practice. I still use these board games to take a break at the end of tutoring sessions and for fun review of words. 

I wanted a large, colorful board game that would allow me to easily change out the words we were practicing so I could add more difficult words as we learned new concepts. 


First you'll need a large poster board, post-it notes, sharpies, and a large index card. You may also want washi-tape to add color or a pencil to trace things out before using the permanent sharpie. 

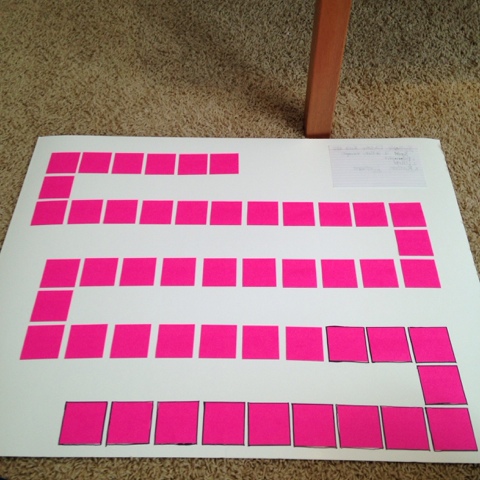
Pick a side to be your "Start" and leave room for a big "Start" square/picture. Lay out your post-it notes with a bit of room between.


Trace each post-it with a sharpie. This makes perfectly-sized squares that allow you to change out the post-its or move them around however you want but not need to re-make the entire board game.


Keep going! This time I decided to make a simple back and forth pattern. Be sure to leave enough space on the edge of the path so students don't get confused about where the next square they can hop to is.


And keep going! I traced each post-it after I had my path all laid out. I'd say making this game took 2 hours, including a break to nurse my six month old. 


Then add a start area! This game is going to be basketball themed because my newest student is a huge basketball fan. (I should have used the orange post-its but of course hindsight is 20/20)

I also traced a large index card at the top. I write each of our spelling rules on large index cards and so this way I can put the appropriate spelling rule at the top to remind the student as we play.


Last I added details to make it more fun! I bordered the spelling rule box with red washi-tape, added a basketball hoop as the finish line, and added arrows to make playing more random and interesting. I've learned that the more opportunities there are to be sent WAY back or WAY forward unexpectedly the more fun and the longer the game lasts. The rule with this game will be that if you land on a box with an arrow pointing out from it you have to go to the box the arrow points you to.

Simple, but effective.


Write a word on each post-it and your game is all ready to play! We play with colored, plastic counting bears and a dice. I've also used matchbox cars and lego guys to play!  As my student goes through the levels and learns new words I can replace these post-its with new ones to introduce new practice words.